How to Remove Filler Words from Video Without Losing Flow
Learn how to remove filler words from video with detection, review and clean cuts that keep natural speech flow, plus a fix checklist.
Twelve disfluencies per minute made speakers sound notably less effective, while five or fewer didn't significantly harm perceived effectiveness, in a 2024 public-speaking study. That's a useful reason to stop treating every hesitation as an editing mistake.
To remove filler words from video without losing flow, cut the interruptions that obscure the message, not every trace of spontaneous speech. A polished product explanation should still sound like someone explaining a product, not a sentence assembled from disconnected syllables.
How Much Filler Your Clip Actually Has
Count before you cut. Listen to the raw recording and mark each um, uh, er, erm, and false start, keeping deliberate silence separate. Divide the number of marked events by the recording's running time in minutes.
For a hypothetical clip, an ad lasting forty-five seconds with nine filler events works out to twelve per minute. That's a reason to inspect the whole recording, rather than trimming only the opening hesitation.
Use the rate to set your editing effort
The Journal of Applied Behavior Analysis study tested 0, 2, 5, and 12 disfluencies per minute, finding the strongest negative effects at the highest rate and no significant harm at five or fewer. The measured effects below come from that experiment; the editing levels are practical recommendations, not tested editing prescriptions.
Cleanup level by filler rate
| Disfluencies per minute | Measured effect on perceived effectiveness | Editing level to apply |
|---|---|---|
| 0 | No penalty measured | Skip filler removal; trim only false starts |
| 2 | Not significantly harmed | Light pass on obvious clusters |
| 5 | No significant harm | Remove dense clusters; keep occasional pauses |
| 12 | Strongest negative effect, significantly reduced effectiveness | Full cleanup pass with human review |
A clip-wide average doesn't tell you where the trouble is. A speaker might deliver the product demonstration smoothly, then stumble through the offer. Mark those clusters separately so you don't apply the same aggressive treatment to clean passages.
Also distinguish frequency from duration. A brief hesitation and a drawn-out restart may count as events, but they require different edits. The restart might contain a useful breath or a better expression that you'll want to retain.
Practical rule: Use filler rate to budget your attention, then use meaning and delivery to approve each cut.
This gives you a cleanup level before opening an editor. It doesn't give you permission to delete a particular word. That decision requires listening to what the word does in the sentence.
Which Words to Cut and Which to Keep
The most damaging cleanup mistake is cutting words that carry meaning. Non-lexical fillers, such as um and uh, aren't interchangeable with discourse markers, such as like, well, and you know.
Accessibility research on disfluency editing distinguishes these categories because removing meaning-bearing words can alter the speaker's intention. Treat a detected word as a candidate, not a verdict.
Filled pauses are also ordinary speech, not rare failures. An analysis of the British National Corpus 2014 counted 21,946 instances of erm and 14,606 instances of er. Editing should make a recording easier to follow, not punish the speaker for sounding conversational.
Filler types and default editing action
| Word or pause | Usual function | Default action |
|---|---|---|
| um, uh in clusters | Non-lexical filled pause | Cut |
| erm, er before a thought | Non-lexical filled pause | Keep unless stacked with other fillers |
| like as a hedge or comparison | Possible discourse marker | Flag for review |
| you know | Shared-context discourse marker | Protect |
| Repeated phrase or restart | Self-repair | Cut |
| Deliberate pause before a key line | Emphasis or delivery | Keep |
These are defaults, not unconditional rules. A repeated phrase might be an accidental restart, or it might be deliberate emphasis. Listen for stress and intention before shortening it.
Build a protect-list before batch editing
Add meaningful comparisons, qualifications, recurring expressions, and intentional pauses to a protect-list. Keep the original transcript beside the proposed edit, or retain an untouched timeline so you can compare the delivery.
For example, deleting like from a comparison can break the sentence. Removing a hedge can make an approximate statement sound definite. A pause before a price may be part of how the speaker introduces the offer, rather than dead air.
Choose an editorial mode even if your software doesn't provide named settings:
- Conservative: Remove abandoned takes and unmistakable filler clusters. Preserve conversational rhythm.
- Balanced: Also shorten distracting hesitations, approving uncertain words individually.
- Aggressive: Inspect every candidate and tighten redundant delivery, but retain meaning-bearing language and necessary breaths.
I'd start with balanced cleanup for a product explainer and conservative cleanup for a personal testimonial. Aggressive cleanup is appropriate only when the finished delivery still sounds intentional.
If removing a word changes what the speaker meant, leave it in.
Choose Your Removal Method First
For a short clip with a sensitive claim or a carefully delivered offer, manual timeline editing gives you direct control. In DaVinci Resolve, Adobe Premiere Pro, or Final Cut Pro, listen for each interruption, mark its boundaries, and remove the unwanted span.
The trade-off is attention. You're locating, cutting, joining, and checking each event yourself. It's manageable for an isolated deliverable, but repetitive across a batch.
Transcript-based editing changes how you work with the footage. Generate a timestamped transcript, select the unwanted language, and let the editor apply that selection to the timeline. Confirm that deleting text removes the associated media; changing a caption alone doesn't clean the recording.
Compare the work you'll still need to do
| Method | Detection basis | Control over each cut | Time cost |
|---|---|---|---|
| Manual timeline editing | Listening and waveform inspection | Direct control over boundaries and transitions | Highest hands-on effort |
| Transcript-based editing | Recognized words and timestamps | High, if media boundaries remain adjustable | Less searching, with individual join checks |
| Automated detect-and-cut | Transcript and acoustic context | Depends on available review and restore controls | Lowest initial cutting effort, followed by review |
A 2024 automated-video-editing study involving 129 participants found significant time savings compared with manual editing. That supports using automation to reduce repetitive work, not assuming its output needs no inspection.
An automated workflow can flag candidates, cut corresponding media, and rebuild captions. Before committing to it, test whether you can restore a mistaken deletion and adjust a boundary without rebuilding the sequence.
Also separate silence removal from filler removal. A silence detector looks for quiet gaps; a spoken um contains audio. Turning silence removal up won't reliably solve spoken hesitation and can strip useful breathing room instead.
For a single short clip, manual or transcript-based editing is a sensible starting point. For recurring talking-head batches, automated detection is more practical, provided you retain a reviewable original and a straightforward way to undo cuts.
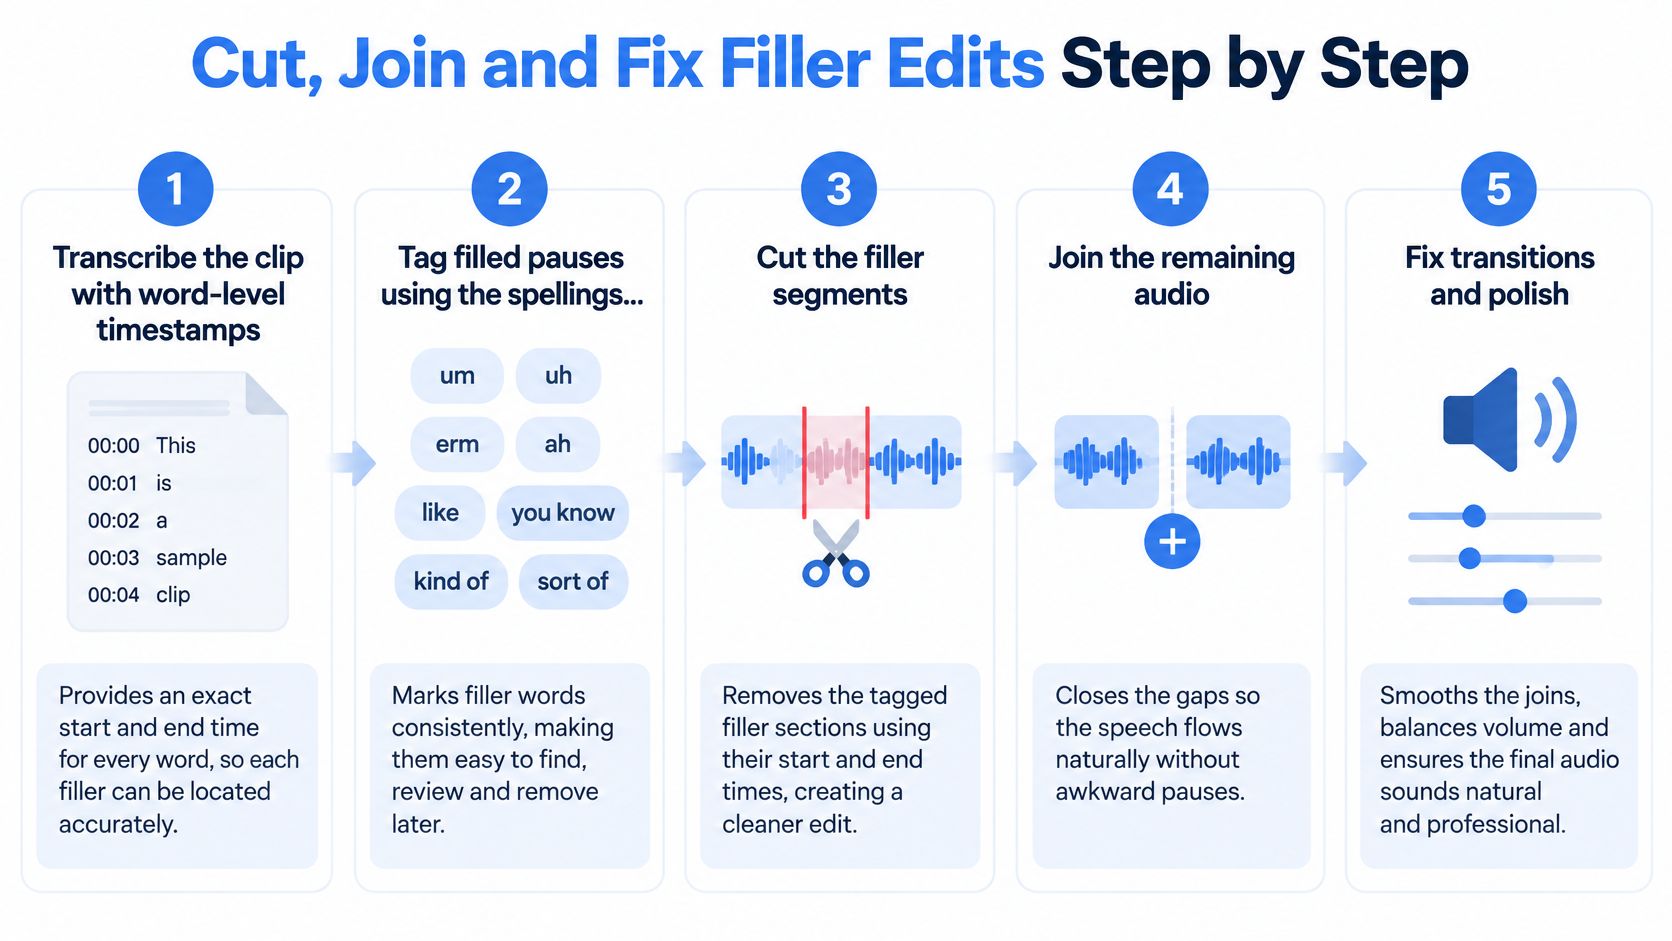
Cut, Join and Fix Filler Edits Step by Step
Keep a duplicate of the original sequence before cleanup. Work on linked audio and video so removing speech doesn't leave the picture running on a different timeline.
Use this workflow to keep detection, editorial approval, and the physical edit separate.
Detect and approve the candidates
Transcribe with word-level timestamps so you can locate each candidate precisely. Use a transcript that retains hesitations rather than rewriting speech into polished prose. Check that selected words correspond to the sound you hear.
Tag filled pauses so the search catches spelling variations. Search for um, uh, er, erm, and eh, then listen around each result. Don't assume the transcript has captured every sound, particularly when a hesitation blends into a breath.
Flag repetitions, restarts, and self-repairs so you can preserve the complete thought. If the speaker begins a product benefit, abandons it, then delivers it cleanly, compare the attempts before choosing which to keep. Avoid joining the beginning of one attempt to an incompatible ending from another.
Classify each candidate before deleting it so you don't remove intentional language. Apply your protect-list and approve ambiguous detections manually. Pay particular attention to sentence openings, where a conversational marker may establish contrast or connect the statement to an earlier point.
Transcript context is useful here. In one evaluation reported in a study of automated disfluency detection, an ASR-assisted detector achieved 94.2% F1, compared with 71.0% F1 for an audio-only system. Those are evaluation-specific results, not an accuracy promise for your footage.
Make the cut and repair the join
Cut the corresponding audio and video span so the transcript and media stay consistent. Zoom into the waveform and listen for the preceding word's final consonant and the following word's onset. Place boundaries outside the unwanted sound without shaving either neighboring word.
If the filler overlaps useful speech or a necessary breath, try shortening it rather than forcing a complete removal. A small remaining hesitation is preferable to a damaged syllable.
Close the gap with a short crossfade or a gently tightened transition so the join remains unobtrusive. Blend compatible room tone and avoid overlapping speech so far that consonants double. Slight time compression can tighten a remaining gap, but it isn't a substitute for repairing a bad cut.
Watch the picture as well. A clean audio splice may coincide with an obvious head movement. Cover that discontinuity with relevant product footage when available, or retain a less aggressive edit rather than introducing a distracting visual jump.
Regenerate captions from the final timeline so they follow the edited speech. Check product names, prices, qualifications, and sentence endings manually. Don't preserve caption timing from media you've removed.
For a visual companion to the editing routine, use the video below.
Diagnose the result by what you hear
Choppy speech symptoms, causes and fixes
| Symptom | Likely cause | Fix |
|---|---|---|
| Audible click at each cut | Hard cut with no crossfade | Add a short crossfade or time compression at the join |
| Rushed, breathless delivery | Every pause removed | Restore a short pause before key points and prices |
| Captions out of step with speech | Captions built from the original transcript | Regenerate captions from the final timeline |
| Speaker sounds different mid-clip | Aggressive cleanup in one stretch | Compare with conservative mode and protect the affected words |
| Meaning shifts after edit | Discourse marker removed | Restore the word and add it to the protect-list |
Review troublesome joins with surrounding speech, not just as isolated fragments. A splice can sound acceptable on a loop yet feel abrupt inside the sentence.
With our editor, you can request changes in plain words, such as making captions bigger or cutting the first line. Keep revision requests specific enough that you can verify the result.
A healthy edit preserves the speaker's underlying pace, keeps captions aligned, and never begins a sentence mid-thought. The fix is complete only when the clip plays naturally at full speed.
Check the Clip and Run Your First Pass
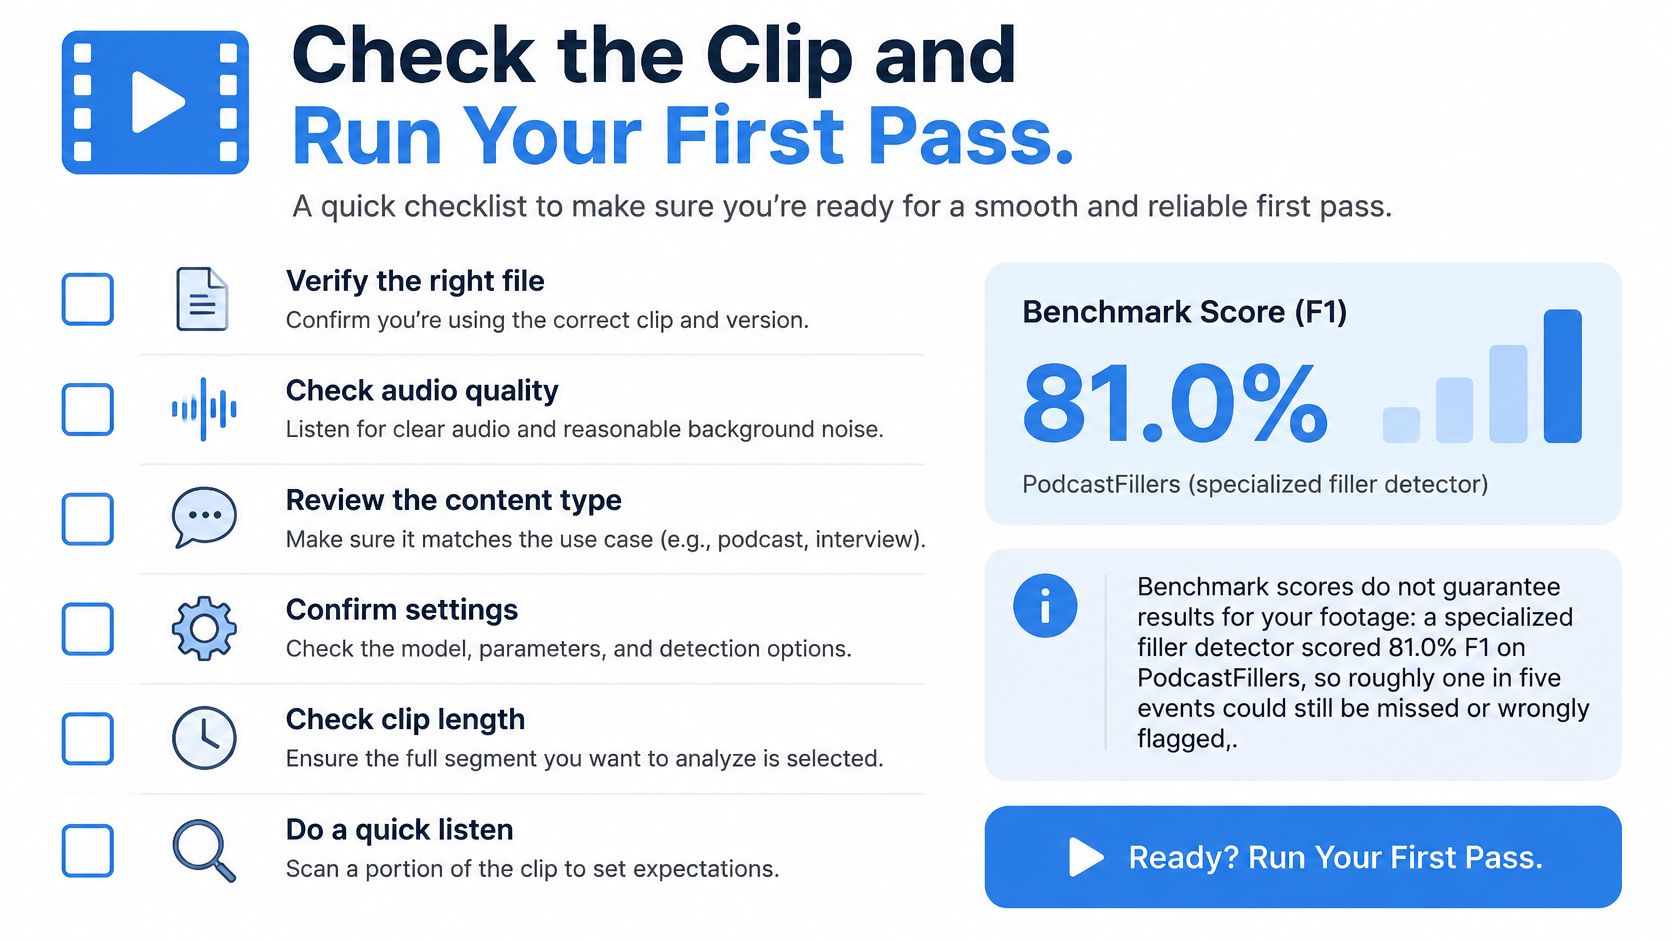
Published accuracy figures describe test data, not your microphone, accent, or speaking style. Precision and recall capture the two ways a detector can fail. Low precision means it flags speech you should keep; low recall means it misses real fillers. For spoken edits, I'd favor precision, because a wrong deletion can damage the sentence, while a leftover hesitation is easy to catch in review.
Use this checklist before accepting a batch of edits.
Review in a deliberate order
- Check detection against your recordings: Manually mark the genuine fillers in a representative sample, then compare the tool's flags. Precision asks how many flags were correct; recall asks how many genuine fillers it found. Separate results by accent, language variety, speaking speed, and microphone rather than relying on a combined impression.
- Favor confident deletions: Raise the acceptance threshold if the tool repeatedly selects meaningful words. If it doesn't expose confidence controls, approve uncertain candidates manually rather than batch-deleting them.
- Keep context around the cut: Leave review handles on either side of every deletion so you hear the phrase, not just the join. Check whether the speaker still enters and exits the thought naturally.
- Inspect waveform continuity: Look for an abrupt boundary, but trust playback over appearance. A neat-looking join can still contain a clipped consonant, doubled breath, or change in room tone.
- Check caption-to-audio alignment: Watch the exported file, not only the preview. If timing drifts across the whole clip, fix the underlying media alignment before adjusting individual words; our guide to syncing video and audio covers that fix.
Never run a blanket search-and-delete on like, well, or you know. Search can locate candidates, but it can't make the editorial decision for you.
Start with a manageable clip
Choose a recent talking-to-camera recording and count its fillers before processing it. Write down the runtime, event count, cleanup level, and any protected language. Keep those notes with the project so another editor can understand the choices.
For a lightly interrupted recording, trim abandoned starts and obvious clusters. For a denser recording, run the full routine and inspect every proposed deletion. When the count sits between light and heavy, start conservatively rather than guessing at a precise cutoff.
Publishing check: Watch the entire finished video with sound and captions enabled, even when the automated preview looks ready.
Automated output can contain mistakes, including in transcribed captions. Check the actual wording of the offer, any qualification, and the final call to action before publishing.
Finish by counting the fillers in your last three videos and noting which run heavy. Use that small audit to decide which recordings need detailed cleanup and which mainly need their natural delivery left alone.
Mimic trims pauses, ums, and false starts from filmed clips and adds captions, with editable cuts, timing, and text. Visit Mimic with a recent talking-to-camera recording, generate an edit, and review it against your protect-list before publishing.