Adding Background Music to Video: Levels and Ducking Guide
Learn how adding background music to video keeps speech clear: set levels 18-20 dB below dialogue, duck automatically, and check loudness before publishing.
The most repeated advice about adding background music to video is a fader position. Set the music to 10 or 20 percent, the advice goes, and the voice stays clear. That number means nothing on its own, because two tracks sitting at the same fader position can sound very different in perceived loudness, and a dense synth pad at 15 percent will bury a word that a sparse plucked riff at 30 percent never touches.
A percentage describes where the slider sits, not what the viewer hears. What decides whether the words survive is the gap in decibels between speech and bed, the frequencies the track occupies, and the speaker the video plays through. All three shift from segment to segment inside one clip, so any fixed level is wrong somewhere. The mix that sounds balanced in the edit timeline can lose whole sentences on a phone speaker at half volume. I judge a music mix by whether speech survives phone speakers, earbuds and low playback volume, because that is where most video gets watched.
The arrangement itself is older than talkies. Sound was first synchronized with pictures in 1894, and by 1931 post-production crews were mixing separate voice, music and effects tracks after filming, as the history of sound film records. The practice settled on the same shape it has now: speech on top, music underneath, and a deliberate distance between them. The modern addition is licensing, since a track you have no right to use gets a video muted or pulled no matter how well it was mixed.
Music Levels That Keep Dialogue Clear
Keep the music about 18 to 20 dB below the voice while anyone is speaking. That is the starting point I'd hand a creator working on talking-to-camera footage, and it holds once the voice itself is clean and even. Editors who want more room mix in a wider band of 10 to 20 dB below dialogue, though the bottom of that band only works with a sparse track that stays clear of the words.
Set the target per segment, because no clip is uniformly full of speech.
| Segment | Music level versus voice | Action |
|---|---|---|
| Active speech | 18-20 dB below voice | Duck under every spoken sentence |
| Product claims and calls to action | 20 dB or more below voice | Apply the deepest duck on these phrases |
| Pauses and silent demos | Up to about 10 dB below voice | Raise the bed in the gaps |
| Intro or outro with no speech | Mixed to taste, checked against the overall loudness target | Fade in at the start and out at the end |
The gap does more than keep words audible. Music in advertising shapes how audiences respond to a spot and what they remember of it, as the EBSCO research starter on popular music in advertising summarises. A bed doing its job shifts how a viewer feels, and a bed fighting the voice undoes that. The same thirty seconds can read composed or frantic depending only on the distance between speaker and track.
The deepest duck earns its place on the claims. A price or benefit the viewer half-hears reads as a claim the video never made.
Run one check before export. Play ten seconds of speech over the bed at a low listening level and ask whether every word lands without reaching for the volume. If you have to turn it up to catch a phrase, bring the bed down rather than pushing the voice up. Hold that relationship through the zooms and jump cuts in a talking-head video edit and the rest of the mix gets easier.
Confirm the Music License Before You Publish
"Royalty-free" describes a payment model, not a permission. Pairing music with video generally requires synchronization rights, and crediting the artist, using a few seconds, or pulling the fader down doesn't remove that requirement, as Universal Production Music's guide to using music in videos legally sets out. Creative Commons adds a second trap: a licence that permits commercial use may still restrict adaptations, and a track used as a soundtrack raises derivative-work questions of its own.
The pressure is greater than it seems because music is what viewers remember. In 2024, 82% of Gen Z respondents and 70% of millennial respondents said they discovered new artists or music through social media or user-generated video sites, according to Deloitte's Digital Media Trends study, which is why recognisable tracks end up in brand videos and why they need clearing first.
Work the decision in this order:
- Identify the rights holder. The label, the library, or the composer, not the site that hosted the file.
- Confirm commercial and platform coverage. A personal-use licence fails the moment the clip becomes a paid ad.
- Read the attribution clause. Some licences require on-screen credit in a specific form.
- Check client and paid-media use. A client's usage rights aren't automatically yours.
- Keep proof. Store the licence text with the project file.
- Plan the replacement. Platform music policies change, and takedowns don't wait.
| Source | Paid ads and client use | Platform coverage | Attribution and adaptation limits |
|---|---|---|---|
| Creator-owned music | Yes, if you hold all rights in writing | Yes | None beyond your own terms |
| Public-domain recordings | Usually yes, check the recording rights | Yes, the recording itself may still be protected | None required |
| Creative Commons tracks | Only if that licence version grants commercial use | Only where the licence covers the platform | Attribution and no-adaptation terms may apply |
| Platform-native libraries | Only inside the platform's own terms | Platform-specific | Often tied to the platform |
| Subscription libraries | Only if your tier includes client and paid-media use | Set by each library's terms | Check for client and paid-media coverage |
Free music gets expensive in one specific way: it creates takedown, replacement and client-compliance work later. Mimic's built-in styles and sounds can be used in exported videos for personal and commercial purposes, and any export still deserves a human review before it posts, since automated output can contain mistakes, including in transcribed captions. Confirm the licence covers the exact use, file the proof, then look at the finished video once more.
Choosing a Track That Leaves Room for Speech
Audition the track before it ever goes under your voice, and reject most candidates in the first ten seconds.
- A steady pulse, no vocal. A sung hook competes with speech in the same frequency band and the same attention span.
- Energy low and high, quiet in the middle. Tracks with most of their weight under 200 Hz and above 6 kHz leave the consonant range open.
- WAV or AIFF over MP3. Compressed sources leave less room to cut and start showing artifacts once the bed is pulled down.
- No dramatic builds. A riser that peaks exactly when the speaker names the price splits the viewer's attention at the worst moment.
Then test it properly. Lay 20 seconds of your own voice over the candidate at the target level from the levels table and listen for whether t, k and s survive. Most tracks fail here, and failing at this stage costs nothing.
Mood comes after intelligibility, not before. An upbeat bed suits a product demo, a restrained texture suits a testimonial, and either one is useless if it swallows a syllable. Pick a track that spans the full runtime or loops cleanly on a phrase boundary, so you're not stitching seams mid-sentence.
Keep two or three backups licensed for the same use before you commit, since a track can fail the voice test at full length or get flagged later. Note which candidate passed and why, so the same filter runs faster the next time you make a highlight video from a longer recording.
Adding and Ducking the Music Step by Step
Run these steps in this order every time. Changing the sequence, especially setting music before the voice is levelled, creates most of the problems people blame on the track.
The four stages below are the short version of the workflow. The numbered steps after it are where the decisions live.
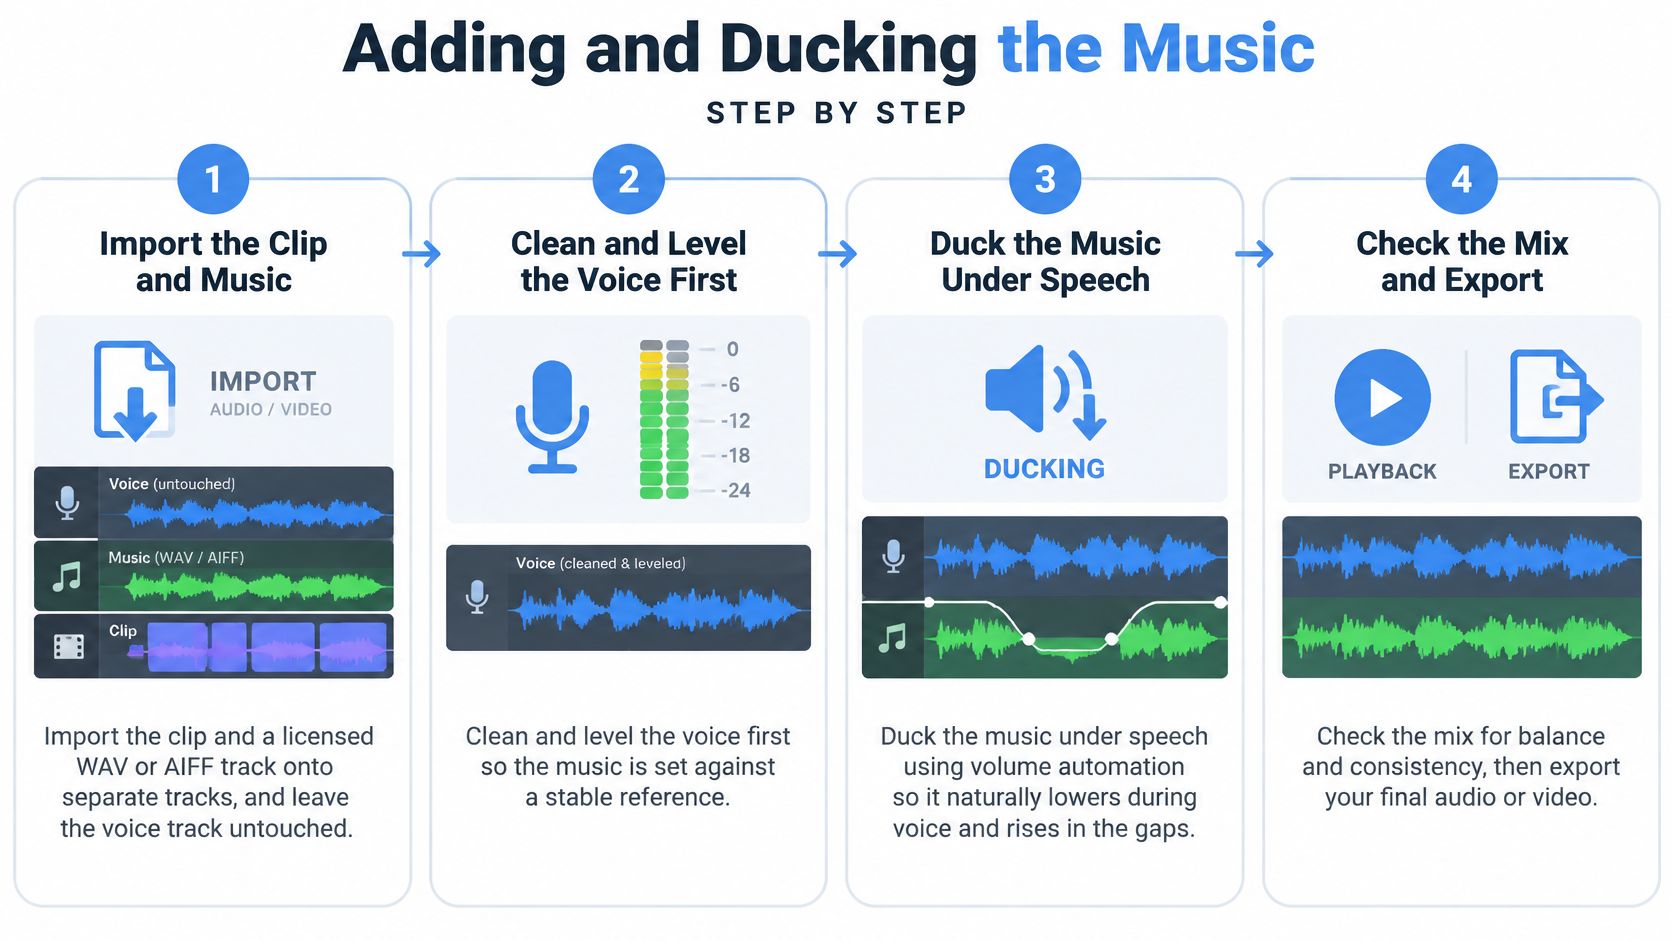
- Import video and music on separate tracks. Leave the voice track untouched so you can return to the original at any point. The usual mistake is laying the bed onto the same track and later discovering nothing can be adjusted independently.
- Clean and level the voice first. Tame room noise, even out the loud and quiet sentences, and only then judge the music. Mix against an uneven voice and the ducking ends up compensating for a problem that was never about music.
- Trim the music to the video and fade it out. End on a phrase boundary and use a fade of one to two seconds. A hard stop mid-note is the most common giveaway of an amateur mix.
- Set the bed at the segment target. Start near the top of the range for that segment and pull down, because it's easier to hear what you're removing than to guess what to add. Starting quiet and creeping up ends with a bed that's uniformly too loud.
- Automate ducking as a time-based rule. Reduce the music whenever speech is detected, use a release of about half a second to one second, and add short fades at phrase boundaries. Copying someone else's threshold never works, because it depends on how hot your voice was recorded.
- Restore the bed in the gaps. Silent B-roll, pauses and intros are where the music earns its place. A bed that stays ducked through every gap sounds like it's apologising.
- If the voice is still masked, cut the music rather than boosting the voice. A broad, gentle reduction in the region where consonants live opens space; pushing the dialogue up instead brings harshness and sibilance with it.
- Deepen the duck on the phrases that carry money. Product names, prices and calls to action get the deepest reduction in the whole video. Those are the words a viewer has to catch while scrolling.
The habit that separates a clean mix from a lucky one: make every level move in 2 dB steps and listen after each one. Big jumps hide the point where the voice stopped being clear.
A short visual pass over the same sequence:
Listen through the first minute with the music muted, then with it in. If the voice thins or flattens when the bed comes up, pull the bed down 2 dB at a time until it doesn't. Save the ducking, EQ and fade settings as a preset for recurring brand videos, then review claims, hooks and subtitles by hand, because masking costs the most where a viewer has to catch one specific word.
Fixing Buried Dialogue and Checking Before Export
Viewers never report a loudness figure. They report that they couldn't hear the price. Match the symptom to the fix before you start moving faders.
| Symptom | Likely cause | Fix |
|---|---|---|
| Words vanish on phone speakers | Bed too loud or too dense in the speech range | Cut around 3-5 kHz on the music with a broad bell, then lower the bed 2-3 dB |
| Voice buried during product claims | No deeper duck on key phrases | Add a duck of 20 dB or more on claim and call-to-action lines |
| Clear in headphones, lost in a noisy room | Mix checked only at studio volume | Test at low volume with background noise and lower the bed by 3-10 dB |
| Music pumps on every word | Release too fast or no fades at phrase boundaries | Lengthen the release and add short fades at phrase boundaries |
| Volume jumps after cuts | Silence removal changed the average level | Re-check the overall loudness and adjust the bed to match |
Loudness numbers to check before export
Mix on a loudness meter, not a peak meter, because perceived loudness is what the viewer hears. Aim for about -14 LUFS integrated on the combined master, with a working range of -13 to -15 LUFS for YouTube-oriented delivery, and watch true peak so the export doesn't clip, as Sweetwater's guide to mastering audio for YouTube recommends.
When words disappear on small speakers, work subtractively on the music. A broad bell cut of 3 to 5 kHz on the bed frees the consonant range without touching the dialogue. Treat that band as a starting point. The microphone, the speaker's voice and the genre all shift where masking sits, so sweep the bell while the voice plays and stop where the consonants come forward. Keep an unprocessed music master so you can revisit the cut instead of rebuilding it.
Low playback volume is where most mixes fall apart. AES guidance on speech intelligibility notes that quiet listening pushes softer speech elements below the hearing threshold or under background noise, and it reports hearing-expert advice from a Swedish public-broadcasting study to test versions with background sound lowered by 3 dB or 10 dB. If the words survive only when the volume goes up, the bed is the problem.
Run this pass before anything goes out:
- Phone speaker. The weakest device most viewers will use, and the one that exposes masking first.
- Earbuds. Cheap ones, because that is what most of the audience owns.
- Laptop speakers. Different bass behaviour, same question about consonants.
- Quiet playback. Turn the volume down and check that product names still land.
- Added noise. Play it once with a fan or street noise in the room.
Silence removal and jump cuts shift the average level of the whole programme, so repeat the loudness check last. If the edit involves removing filler words from video, run the meter pass after those cuts so the measurement reflects the final timing, and confirm the music doesn't jump at any seam. An export passes only when the voice stays clear on the weakest device a viewer is likely to use.
Mimic takes a raw talking-to-camera clip and returns it cut, captioned word by word and styled like a reference video you choose, with built-in styles and sounds you can use for personal and commercial purposes. Get the level gap and the licence right, then let the edit handle the cuts and captions so the only thing left to judge is whether the voice survives a phone speaker. Start with your next clip at Mimic.