AI Video Editor for TikTok: How It Speeds Up Editing
See how an AI video editor for TikTok handles vertical framing, captions, pacing and revisions, and what to check before you post.
The take is filmed at nine at night and it has to be posted by morning. Somewhere in those 90 seconds are one strong opening line, a product held up to the light, two false starts and a pause long enough to make a viewer swipe. Cutting, captioning and reframing that clip by hand used to eat the whole evening.
An AI video editor for TikTok gets it most of the way there in minutes. The part that rarely gets written up is the review pass, because the first draft comes back confident and wrong in small, specific ways, and those small ways are exactly what viewers notice. This is what the automation handles well, where it slips, and how to steer it before you hit post.
What an AI Video Editor Automates for TikTok
The routine work of a TikTok edit is mechanical, which is why automation does it well. An editor built for short-form takes your raw recording and runs one pass over it: speech-to-text with word-level timings, silence and filler removal, a vertical crop, burned-in captions, and zoom or title accents on the lines that carry the point. You get back a watchable draft of the entire video rather than a folder of clips.
Volume is what makes that draft valuable. DataReportal's Digital 2025 report put TikTok at approximately 1.194 billion active users worldwide in February 2025, the fifth-most-used social network at the time, with the United States as its largest national market at nearly 136 million active adult accounts. On the posting side, Pew Research Center's survey of U.S. adults found that 52% of U.S. adult TikTok users said they had ever posted a video to the platform. Same face, same product, many variations, and no time to hand-cut each one.
What the tool doesn't decide is the part that matters. You still choose the hook, judge whether a cut changes what a sentence means, confirm that names and product terms came through correctly, and decide whether the tone suits the audience you're talking to. Those are editorial calls, and they're what separates a draft from something you'd sign.
| Task | By hand | With an AI editor |
|---|---|---|
| Transcription | Type each line or skip captions | Automatic transcript with word-level timing |
| Silence and filler removal | Cut each gap on the waveform | Pauses, filler words and false starts found and cut |
| Vertical reframing | Crop and reposition each shot | Subject kept in a 9:16 frame |
| Captions | Type, split and time every line | Generated, then styled and timed to speech |
| Zooms and hooks | Keyframe each zoom and title | Placed on key lines, which you can accept or move |
| Revisions | Search through menus for each setting | Describe the change in plain words |
Working rule: treat the AI edit as a first draft. Your job is three or four focused revision passes, not a rebuild from zero.
Five things to check before you commit to a tool
- A word-level transcript you can correct before captions are placed, not after.
- Auto-reframe with a manual crop override, because the automatic version will eventually lose a product or a second person.
- Caption presets with a visible safe-zone guide, so you can see where the app's buttons will sit.
- Silence and filler removal that undoes cut by cut, in case the biggest pause was a beat worth keeping.
- An export that keeps the source clip, so the next revision starts from the original rather than from a compressed export.
Before you commit, run the tool on a 90-second clip of your own footage with a real product in it. One test file tells you more than a features page.
Fitting Landscape Footage into a Vertical Frame
A wide shot on a phone screen is a thumbnail with dead space around it. TikTok plays tall, so a 16:9 recording either gets its sides chopped off or shrinks to a strip with bars above and below. Everything the auto-reframe does is a decision about which part of your original frame survives, and you can see what that loses in a single glance.
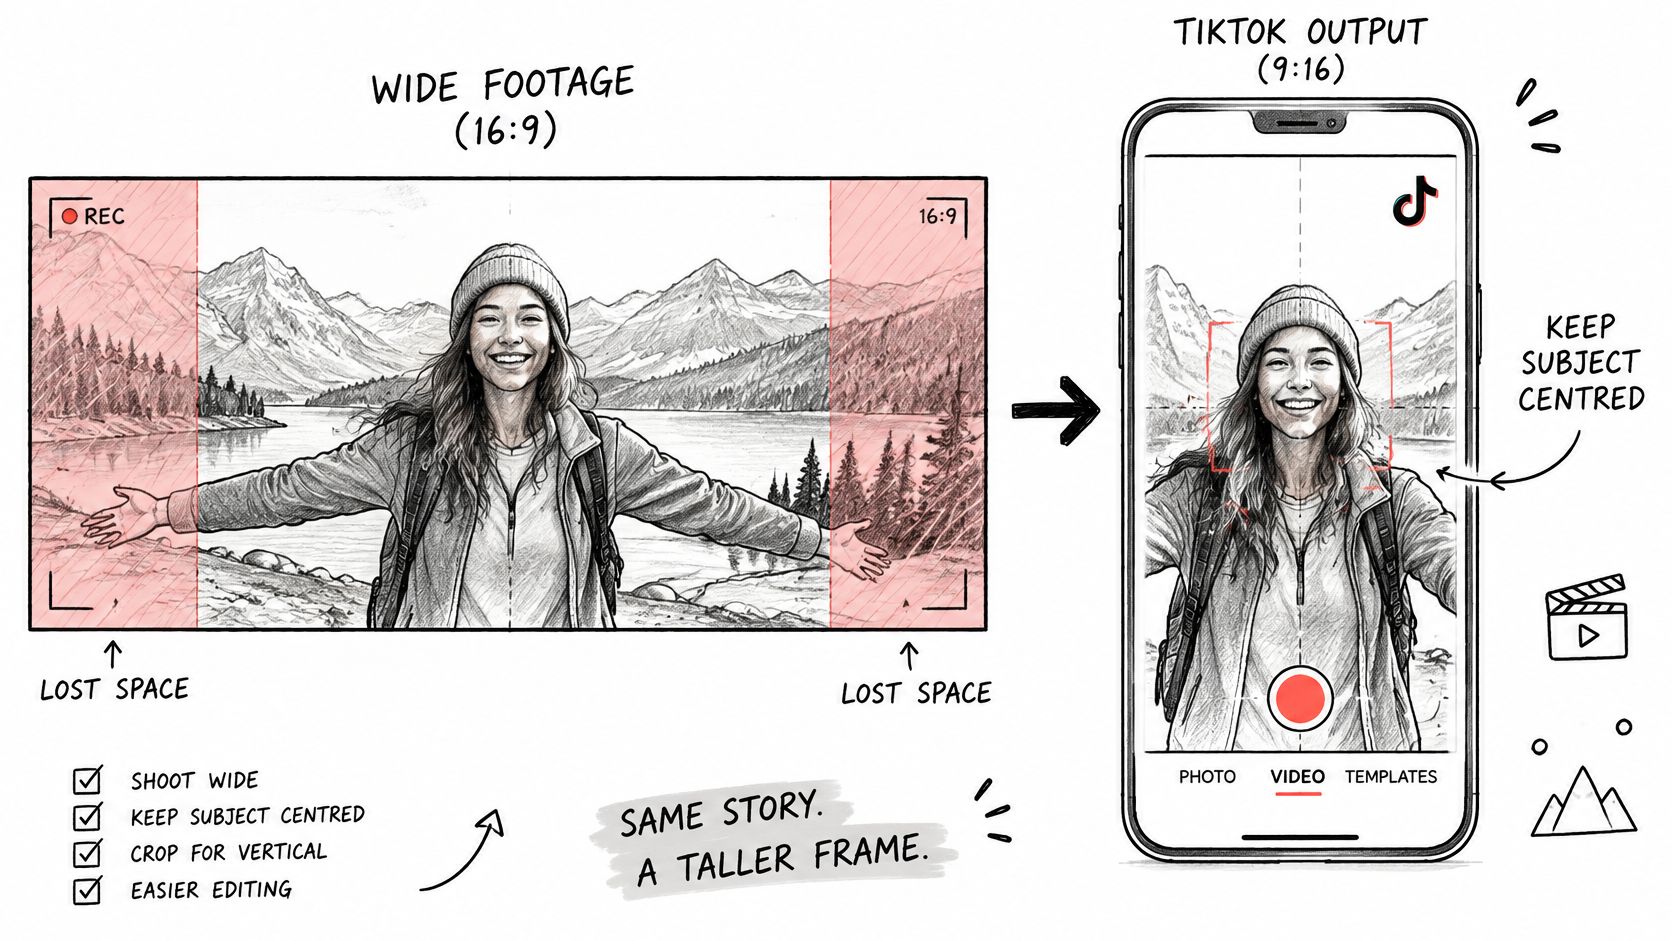
The shoot is where you win this. Sit slightly further back than feels natural and leave extra headroom, because the crop takes the top edge with it and a tight frame clips foreheads. Keep yourself centred and keep the product inside the middle third of the frame, since anything parked near the left or right edge falls outside the vertical window entirely.
Auto-reframe then follows your face and re-centres the frame as you lean, turn or reach for the product. It works well for a single speaker making small movements. It gets lost in three situations: fast movement across the frame, two people sharing the shot, and a product held at the far edge of the original recording. Where that happens, take the manual crop and keyframe it yourself, or cut to a second shot that already sits inside the tall frame.
If you want to see the reframe decision made in real time rather than described, this walkthrough covers it:
Safe zones in plain numbers
Keep captions, titles and key product detail out of the bottom fifth of the frame, where the caption and description pills sit, and clear of the right-hand icon column, where the profile, like and comment buttons stack. The top of the frame is mostly open, which is why a short title line sits comfortably above your eyeline.
For two people in a wide shot, a split-screen layout is usually a better answer than a crop that keeps snapping between them. Two tall panels, one per speaker, uses the frame instead of fighting it.
Then check it the way a viewer will. Play the export at phone size with the sound off. Your eyes should sit near the upper third, and no text should disappear behind the interface.
Captions That Read Well on a Phone
Caption trouble is almost never speech-to-text accuracy. It's a timing and layout problem wearing a transcription costume. Research on TikTok captioning recommends a reading rate of roughly 130 to 160 words per minute, with captions synced to the spoken phrase instead of dumped on screen as full sentence blocks (study on TikTok caption design). An auto-generated caption that's technically correct but flashes past at 220 words per minute is unreadable, and the viewer doesn't blame the tool. They blame you.
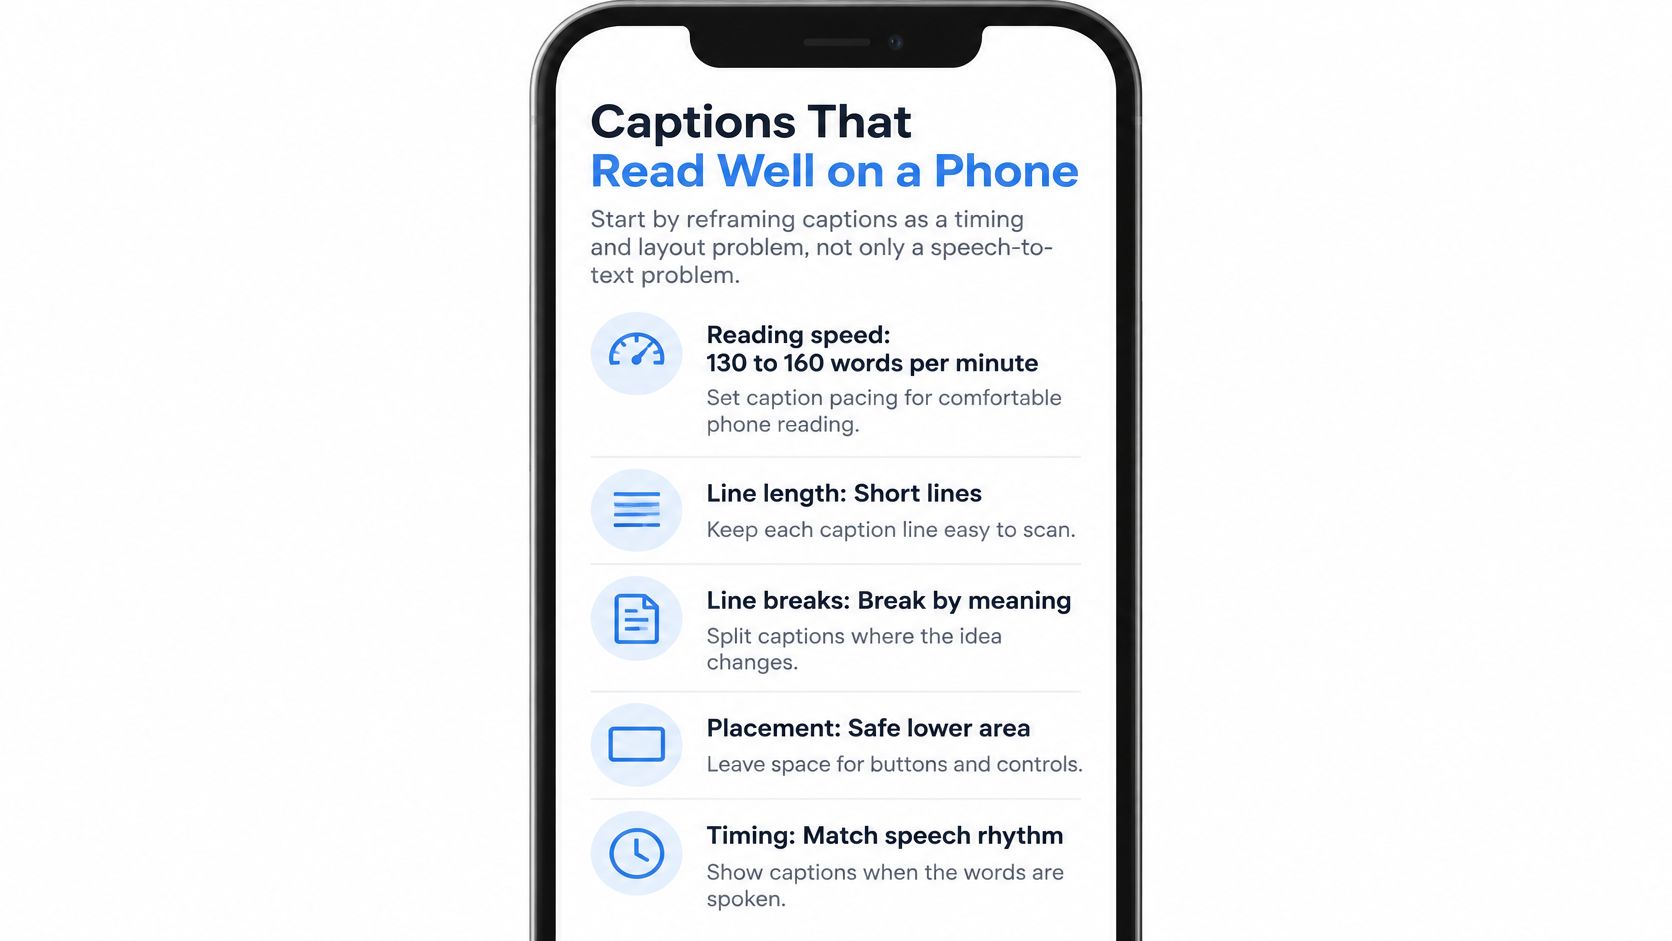
Treat the settings below as your starting preset, then adjust per video rather than per platform trend.
| Setting | Starting point | Why it matters |
|---|---|---|
| Reading speed | About 130 to 160 words per minute | Matches how fast viewers can read while watching |
| Caption length | One or two short lines, synced to phrases | Large text blocks get skipped |
| Contrast | White text on a translucent dark box | Stays readable over bright footage |
| Placement | Above the bottom interface band | Keeps captions clear of TikTok's own buttons |
| Animation | Static or minimal, word-by-word only for slow speech | Motion competes with the speaker and product |
| Accuracy | Check names, prices, brands and technical terms | Transcription errors are visible to every viewer |
The accuracy pass most edits skip
Automatic transcripts fail predictably. They mangle names, brand names, prices, accents and trade terms, and a wrong number on screen reads as carelessness rather than a machine error. The fix takes five minutes: watch the whole export with the sound off and read every caption once, then search the transcript for your product name and any price you quote, because a model that hears "fifteen" will happily print "fifty."
Overlapping speech is the other weak spot. When two people talk over each other, the transcript flattens both voices into one line. Split it into alternating captions or cut one speaker's interruption in the edit.
A caption that's accurate and unreadable is a caption that failed.
Accessibility is where this stops being cosmetic. Research cited in the same study reports that deaf and hard-of-hearing viewers may skip videos with absent or poor-quality captions, and that viewers can give roughly half their visual attention to reading them. Captions are part of the edit, not decoration added at export.
Pacing and Hooks That Keep Viewers Past the First Seconds
The standard advice is to cut harder: faster, snappier, more jump cuts. That advice runs into a wall. A large-scale study of TikTok recommendations collected 9.2 million videos from 347 users and found that user attention stayed stable at approximately 45% even as daily usage increased over time. Roughly half the room is always leaving. Cutting every half-second cannot fix that. Giving the first seconds an actual job can.
Pacing is a decision about where attention lands. An AI editor's useful contribution is narrow and real: it removes pauses and false starts, so your first spoken line arrives almost immediately, and it can place zooms on the lines that carry the argument rather than on every sentence. Restraint is the difference between energetic and twitchy.
Zooms on every line make a video feel nervous. Zooms on three lines make it feel edited.
Treat the first export as a draft and review the opening before anything else. Ask whether the subject of the first sentence survived the silence cut, whether the hook states a payoff or only a topic, and whether the first zoom lands on the line that matters. If the tool trimmed a pause that worked like a comma, put the breath back. If the warm-up runs before the product or point appears, have it trimmed there.
Matching the hook to the video
| Hook type | Example first line | Best for |
|---|---|---|
| Question | Why does your talking-head video get skipped? | Viewers who already face the problem |
| Benefit | Cut a rambling take down to one clear point | Demos and how-to content |
| Result first | Show the finished result in the first frame, explain after | Before-and-after and product clips |
| Contradiction | You do not need a studio to look professional | Challenging a common belief |
Pick the hook by evidence, not instinct. Generate two or three opening variants from the same clip, one question, one benefit, one result-first, then compare which holds viewers past the opening in your own retention numbers. A short keyword-rich line gives the hook a job; the analytics choose the winner.
Two failures to avoid: cutting so aggressively that the sentence loses its subject, which happens when the tool trims a pause that was doing grammatical work, and zooming on every line, which flattens emphasis until nothing stands out. If your raw take is full of “um” and “so yeah,” clean it before the edit rather than leaning on the tool; this guide to removing filler words from video shows what to cut so the first pass has less to fix.
Revising an AI Edit Without Starting Over
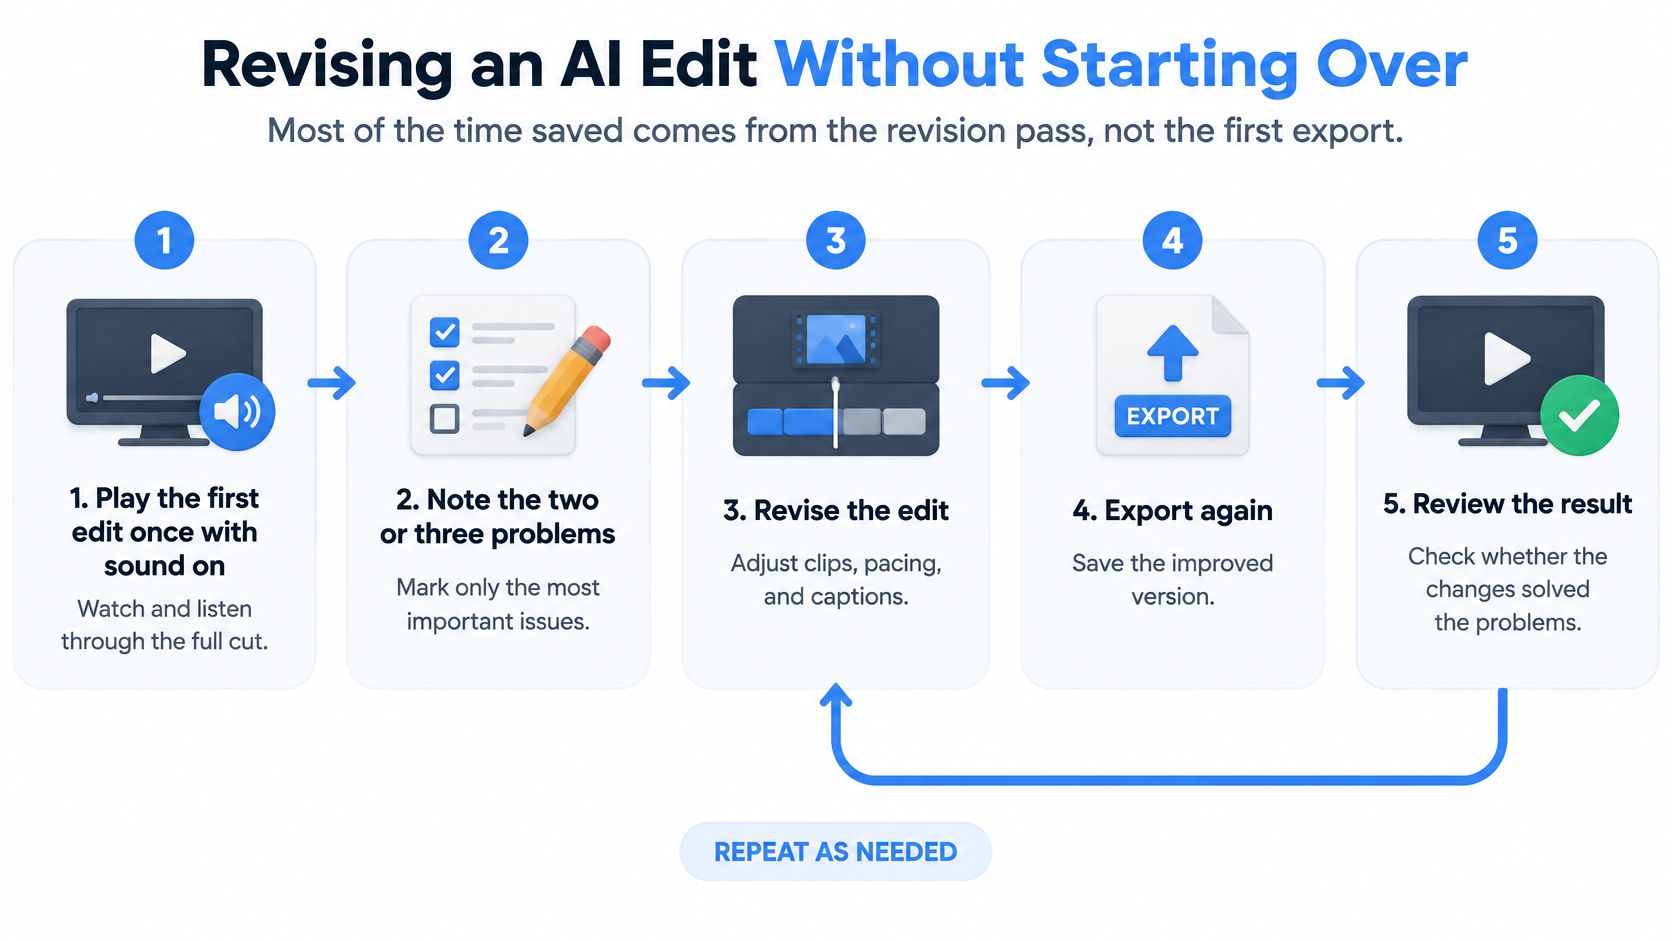
Most of the time you save isn't in the first export. It's in the revision loop, and the loop collapses if you treat every note as a rebuild. Run it in this order.
- Play the first edit once, sound on, all the way through. Note the two or three problems that would prevent someone from watching. Not every imperfection.
- Write each fix as one plain sentence. One change per request, in ordinary language, not a pile of notes submitted together.
- Apply and re-export. Then watch only the section each change touched, rather than re-reviewing the whole video.
- Repeat until the hook, the captions and the pacing hold, usually two or three rounds.
| Plain-language request | What changes | What to check after |
|---|---|---|
| Make the captions bigger | Caption size and line count | Text still clears the bottom band |
| Cut the pause at the start | Dead air before the first word | The hook still lands in the first seconds |
| Zoom in when I say the price | Zoom placed on the key line | The zoom lands on the right word |
| Remove the second intro line | Opening line trimmed | The sentence still makes sense alone |
| Move the product shot after the claim | Demo clip repositioned | The product does not cover the speaker's face |
Why one change per request matters
Bundle five notes together and you lose the ability to tell which one broke something. A caption resize that pushes the last line under the interface, a zoom that now lands half a word early, a trimmed opening that no longer has a subject: none of those are visible when they arrive in the same batch as three other changes. One request, one check.
Teams get more out of this than individuals do. Save the settings that survived review as a named style, so the next recording from the same creator starts from a verified baseline rather than a blank timeline. When four contributors film the same brief, a shared style keeps caption placement and pacing identical across all four, and your reviewer only has to look for content problems instead of re-deciding the look.
Confirm Disclosure and Rights Before You Post
The comfortable assumption is that a cut-and-caption edit counts as ordinary editing, so nothing needs declaring. That assumption is doing more work than the evidence supports. An audit of TikTok search results found that roughly one-quarter of posts contained AI-generated content, but only about half of that content carried an AI label, and most labels were applied by creators rather than by TikTok (audit of AI content labelling on TikTok). An automatic label is not a safety net, and looking like normal editing doesn't settle the question.
Three checks before publishing.
- Did the edit change a person, a voice or a scene? If it altered someone's appearance or speech, or added synthetic footage, apply a clear label and get approval before it goes out.
- Did it only restructure authentic footage? Cuts, captions, reframing, pause removal and added effects rebuild the timeline without inventing anything. That usually needs a review pass, not a synthetic-media label.
- Do you hold the rights? Confirm you own or licence the footage, music and product images, and for brand work record the creator's consent on file.
Our own workflow is deliberately on the restructuring side. You pick a style, drop in your clip plus any demos or images, and get back a captioned, cut video, which is real footage rearranged rather than generated. It still needs your eyes before it goes out, because automated output can contain mistakes, including in transcribed captions.
Then do the one thing almost nobody does. Write down which checks you ran on this clip and keep that note next to the source file, so the decision can be defended months later when someone asks.
Mimic takes a raw talking-to-camera clip and returns it cut, captioned word by word, with a hook, zooms and your product shots in the style you chose, which makes the first draft much closer to publishable than a blank timeline would. Review it before it goes out, the same way you'd review any automated first pass. Start with your own 90-second clip at Mimic and see how much of the Monday night work disappears.